上篇文章简单介绍了Jest配置,通过简单的配置达到可以跑测试。这篇文章聚焦如何进行React项目的测试,侧重点有所不同。
项目技术栈 因为是个通用UI组件库,所以不牵扯redux,api等。整体技术栈较简单
React
TypeScript
Antd
Less
react-intl
测试目标 做测试,首先要确定测什么。
对于工具函数功能正确性的测试
对于组件功能的测试【UI,交互性等】
3A原则
部分验证待测试方法的执行行为与预期相同。
戳这里
测试配置 创建intl-enzyme-test-helper 因为国际化我并不想测试,所以这里进行了mock,假如不mock,会报intlProvider错。
1
2
3
4
5
6
7
8
9
10
11
12
13
14
15
16
17
18
19
20
21
22
23
24
25
26
27
28
29
30
31
32
33
34
35
36
import React from 'react' ;import { IntlProvider , intlShape } from 'react-intl' ;import { mount, render, shallow } from 'enzyme' ;const messages = {}; const intlProvider = new IntlProvider ({ locale : 'en' , messages, onError : () => '' }, {});const { intl } = intlProvider.getChildContext ();function nodeWithIntlProp (node ) { return React .cloneElement (node, { intl }); } export function shallowWithIntl (node ) { return shallow (nodeWithIntlProp (node), { context : { intl } }); } export function mountWithIntl (node ) { return mount (nodeWithIntlProp (node), { context : { intl }, childContextTypes : { intl : intlShape } }); } export function renderWithIntl (node ) { return render (nodeWithIntlProp (node), { context : { intl }, childContextTypes : { intl : intlShape } }); } export function rendererWithIntl (node ) { return renderer.create (<IntlProvider locale ='en' messages ={messages} > {node}</IntlProvider > }
完整code,看这里
吞掉intl国际化缺少错误 因为没有配置国际化信息const messages = {}; // en.json,UT过,但会报一些错,很干扰控制台信息展示,所以这里直接吞掉错误即可。
使用方法
创建enzyme-setup 组件测试用到了enzyme,so还需要启用对应的enzyme-adapter-react-16
1
2
3
4
5
6
import { configure } from 'enzyme' ;import Adapter from 'enzyme-adapter-react-16' ;configure ({ adapter : new Adapter () });
对应jest也需要配置下
1
2
setupFiles : ['<rootDir>/test/enzyme-setup.ts' ]
不配置,会报错
Error:Enzyme.configure({ adapter: new Adapter() })Adapter is the adapter
工具函数测试 工具函数测试是相对最简单的。确定输入输出即可。延伸下,对于包含redux技术的前端项目,假如我们要对一个reducer进行测试,其实跟下面的一样。这类我理解就是纯函数【确定输入,即可确定输出】。
1
2
3
4
5
6
7
8
9
10
import { formatPrice } from '../../components/utils/common-utils' ;describe ('common-utils test' , () => { it ('should return formatted price when value is 0 or undefined or null' , () => { expect (formatPrice (0 )).toEqual ('' ); expect (formatPrice (undefined )).toEqual ('' ); expect (formatPrice (null )).toEqual ('' ); }); });
组件测试 组件测试绕不开enzyme提供的 mount, render, shallow三个方法。
render、mount、shallow的区别
render采用的是第三方库Cheerio的渲染,渲染结果是普通的html结构,对于snapshot使用render比较合适。shallow和mount对组件的渲染结果不是html的dom树,而是react树,如果你chrome装了react devtool插件,他的渲染结果就是react devtool tab下查看的组件结构,而render函数的结果是element tab下查看的结果。
这些只是渲染结果上的差别,更大的差别是shallow和mount的结果是个被封装的ReactWrapper,可以进行多种操作,譬如find()、parents()、children()等选择器进行元素查找;state()、props()进行数据查找,setState()、setprops()操作数据;simulate()模拟事件触发。
shallow只渲染当前组件,只能对当前组件做断言;mount会渲染当前组件以及所有子组件,对所有子组件也可以做上述操作。一般交互测试都会关心到子组件,我使用的都是mount。但是mount耗时更长,内存啥的也都占用的更多,如果没必要操作和断言子组件,可以使用shallow。
组件渲染及交互测试
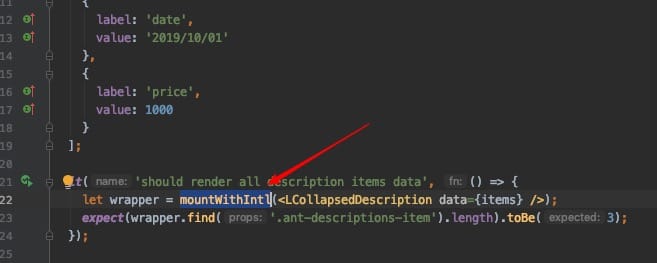
LCollapsedDescription是个具备折叠功能的描述组件
1
2
3
4
5
6
7
8
9
10
11
12
13
14
15
16
17
18
19
20
21
22
23
24
25
26
27
28
29
30
31
32
33
34
35
36
37
38
39
40
41
42
43
44
45
46
47
48
49
import * as React from 'react' ;import LCollapsedDescription , { LDescriptionItem } from '../../components/collapsed-description' ;import { mountWithIntl } from '../intl-enzyme-test-helper' ;describe ('collapsed-description component test' , () => { const items : LDescriptionItem [] = [ { label : 'name' , value : '1111' }, { label : 'date' , value : '2019/10/01' }, { label : 'price' , value : 1000 } ]; it ('should render all description items data' , () => { let wrapper = mountWithIntl (<LCollapsedDescription data ={items} /> expect (wrapper.find ('td' ).length ).toBe (3 ); }); it ('should render two description items data when limit is 2' , () => { let wrapper = mountWithIntl (<LCollapsedDescription data ={items} limit ={2} /> expect (wrapper.find ('td' ).length ).toBe (2 ); wrapper.find ('Icon' ).simulate ('click' ); expect (wrapper.find ('td' ).length ).toBe (3 ); wrapper.find ('Icon' ).simulate ('click' ); expect (wrapper.find ('td' ).length ).toBe (2 ); }); it ('should render description items each row data' , () => { const wrapper1 = mountWithIntl (<LCollapsedDescription data ={items} /> expect (wrapper1.find ('tr' ).at (0 ).children ().length ).toBe (3 ); const wrapper2 = mountWithIntl (<LCollapsedDescription data ={items} column ={2} /> expect (wrapper2.find ('tr' ).at (0 ).children ().length ).toBe (2 ); expect (wrapper2.find ('tr' ).at (1 ).children ().length ).toBe (1 ); }); });
对于上面的case,注意几点
假如case1,将mountWithIntl改为shallowWithIntl,重新跑UT,是挂的,因为按照上面介绍的三个方法差异,shallow只渲染当前组件,而mount和render才会渲染子组件。so这里改成renderWithIntl是可以跑通的。
假如case2,将mountWithIntl改为renderWithIntl,重新跑UT,是挂的,因为render是渲染出实际的dom元素,而首字母开头的标签都是react组件标签,所以肯定找不到。另外simulate方法是不存在的
通过上述的例子,对于三个方法的区别就有了清晰的认知了。在实际使用中,还是老话,按需使用即可。
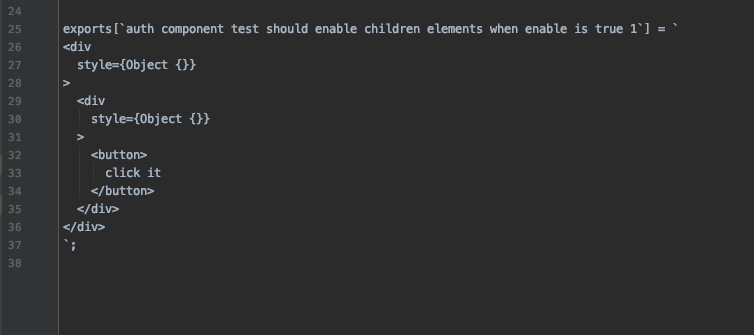
快照测试
snapshot 快照测试第一次运行的时候会将 React 组件在不同情况下的渲染结果保存一份快照文件。后面每次运行快照测试的时候,都会和第一次比较。
1
2
3
4
5
6
7
8
9
import renderer from 'react-test-renderer' ;it ('should enable children elements when enable is true' , () => { const wrapper = renderer.create (<AuthEnable enable > <button > click it</button > </AuthEnable > ).toJSON (); expect (wrapper).toMatchSnapshot (); });
快照测试用于防治无意间修改组件导致的结构和样式变化。
快照测试仅作为补充
假如我们无意中修改了组件导致样式变化,则UT挂的时候会贴出具体的错误信息,方便我们排查。
Enzyme与react-test-renderer快照测试区别 对比发现,react-test-renderer的快照更简单易读,直接会贴出完整HTML源码。
补充部分 围绕着这个UI组件库的测试,基本知识点就这么多。接下来的只是基于这些知识点不断去丰富测试而已。
但既然聊到了测试,这里再补充下关于依赖了redux,redux-saga的测试如何去做。
Reducer测试 redux包含三部分【action,reducer,store】,action是个对象,本身没什么好测的,reducer是个纯函数,所以测试等同于工具函数的测试。store其实就是个大的对象。个人觉得store也不需要测试。我们在对组件或者effects进行测试时,store只需要mock成我们的目标值即可。
Effects测试 在我所参与的项目中,我将所有的请求处理都提取到了effects层,React组件层本身不直接处理任何请求,只负责数据展示。
react组件层不再直接与api请求打交道,是我当前所在项目所采用的方式。
对于单个effects测试,大致如下
注意,API请求,不是我们的关注点,我们关心的只是返回的数据正确否,所以mock掉它
1
2
3
4
5
6
7
8
9
10
export default class SagaSpecFactory { static getAPIStub (apiMethodFunc : any , response : object ): any { return ({ fn, args }, next ) => { if (fn === apiMethodFunc) { return response; } return next (); }; } }
完整代码看这里
1
2
3
4
5
6
7
8
9
10
11
12
13
14
15
16
17
18
19
20
21
22
23
it ('should init app when init app action' , () => { return expectSaga (initAppActionEffects, { params : { } }) .provide ([ { call : SagaSpecFactory .getAPIStub (getUserInfo, { data : user }) }, { call : SagaSpecFactory .getAPIStub (getMenusByUser, menus) } ]) .call (getUserInfo) .call (getMenusByUser, user) .put .like ({ action : { type : GlobalActionTypes .INIT_MENU , menus } }) .put .like ({ action : initAppCompleteAction () }) .run (); });
写在最后 对于测试,有两点感触
不要为了测试而测试,如果写了测试没有带来丝毫的好处,那请不要写。搞开发,写测试都要讲投入产出比,亏本买卖不要做。
测试是为了减轻人工测试的成本,反复测试本就是体力活,同时自动化测试也提高了开发的效率/质量,美好的测试还可以充当活文档。对于一个团队项目,为了提高整体的开发效率,开发质量,个人认为测试要写,只是多少取决于实际情况。
以上都是个人肤浅看法,并不一定都对,但却一定在朝对的方向走。
参考资料